Somethings wrong with my Mac, what should I do?
Something's wrong, what to do now?The first step to take when your Mac isn't working properly, is to determine if it's a software or a hardware problem. In the first case, there are a few bits and bytes (computerdata) messed up. This you can repair yourself. Software problems are not covered in the guarantee service.
In the second case, there's something physically wrong with the machine. This is something for your dealer and an Apple Authorized Service Center. Software or hardware?
Relax: 99 out of a 100 times it's a software problem. Apple does make reliable machines. So don't think too soon that your Mac is broken.
NOTE: sometimes the border between hard- and software troubles can be crossed. Bad RAM (random access memory) can be the cause. You'll soon find out about this soon after you gave your Mac some extra memory.
But first the most important and universal rule of all (no matter what operating system or what brand computer you're using):
>BACKUP REGULARLY!<
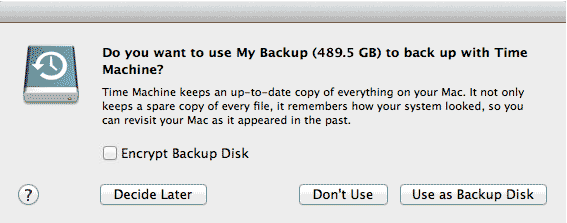
Use Time Machine, the automatic backup program! It's a standard feature of Mac OS X, and it's so easy to use with the help of an external hard drive. MacMiep advises to buy one asap. They aren't expensive and can save you so much trouble. At least cheaper than the pain and sadness of the loss of data or professional data recovery...
The Time Machine chapter can be found here
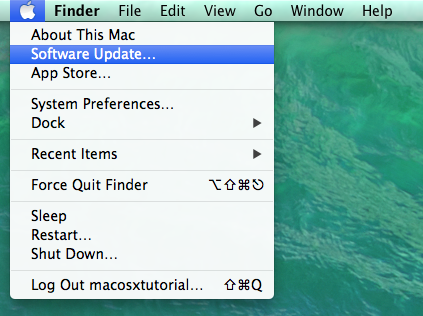
Avoid problems: keep your software up-to-date
It's important to let Software Update do it's job.
I lost my login password!
When you use a wrong password for three times in a row, Mac OS X will ask you for your Apple ID. With the help of your Apple ID you can change your account password. So it's wise to remember your Apple ID too!*.
IMPORTANT:
Make sure your Apple ID was connected to your Mac OS X account before (like explained in the User chapter). Otherwise it won't work!
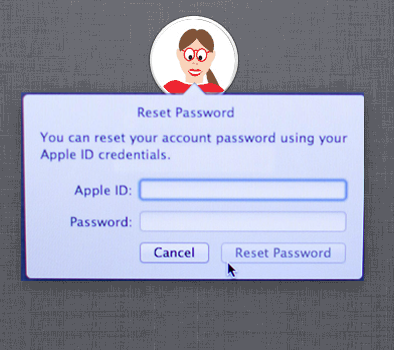
Did you forget it all? Well, then you have to visit an Apple Store with your original receipt / proof of purchase. Give them a call an ask if they are able to help you!
*Write your passwords down somewhere safe!
TIP
Log files
UNIX, the system under the hood, keeps an eye on everything that happens on your Mac. You can choose to check on these Log files in the 'Console' program:
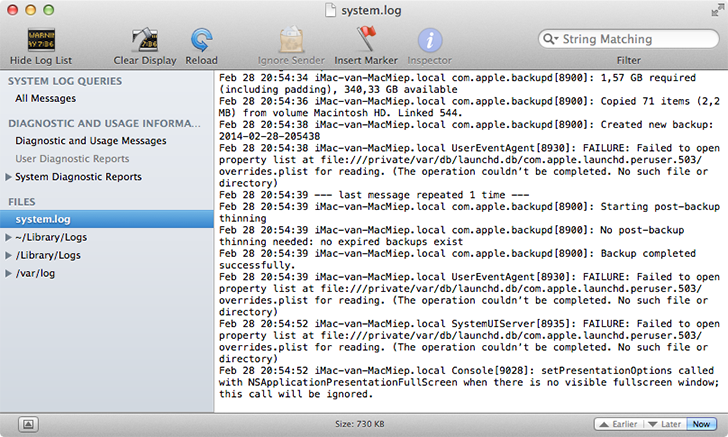
Most things will sound as Abracadabra to you, but Google is your friend!
Log files
UNIX, the system under the hood, keeps an eye on everything that happens on your Mac. You can choose to check on these Log files in the 'Console' program:

Most things will sound as Abracadabra to you, but Google is your friend!
Help my Mac's in trouble!
System crashes are quite rare in Mac OS X. What cán happen, is a program that doesn't react anymore. It's showing an eternally turning 'beach ball' or doesn't do anything at all.
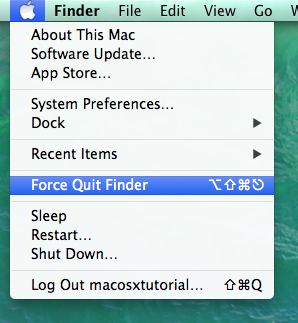
In a case like this, you can stop the program forcefully. This is called 'Force Quit'.
Force Quit
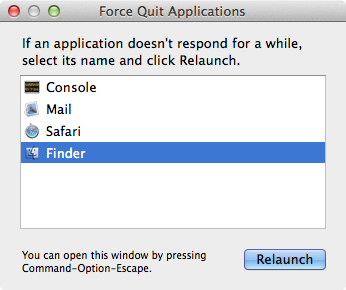
Go to the Apple menu and choose 'Fore Quit...'
Shortcut: Command+Option+Esc (yes that are three keys at once).
 =>
=> 
Restart
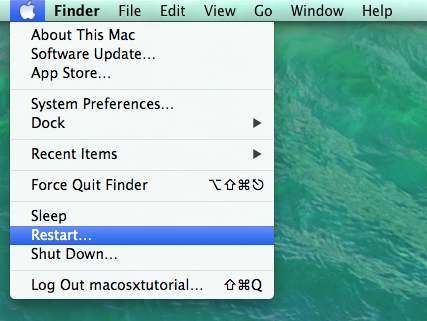
A simple Restart can do wonders. Also to find in the Apple menu:
Throw away program preferences
Sometimes a program keeps working badly, even after a forced quit or restart. What you can do then is throw away the program's Preference file(s). Restart your Mac afterwards.
Why could this help? Every program saves Preferences at quitting and uses them again at starting up. Are there fault's in these prefs, then even after restarting the program, the same mistake will be made because the same preferences will be used.
NOTE: Unfortunately, a restart of your Mac is necessary in Mac OS 10.9 Mavericks. This wasn't the case in any of the earlier Mac OS X versions. MacMiep has no idea why Apple choose to change this. It's a stupid, time consuming measure, and it smells like Windows! EEK! :(
Locating the Preferences folder
You can locate your Preferences folder in the Library folder of your home folder. However, this Library folder is hidden (since Mac OS 10.7 Lion). But there's a trick to let the Library folder show itself:
Keep the Option (Alt) key pressed and go to the Finder Menu 'Go' and then to 'Library'.
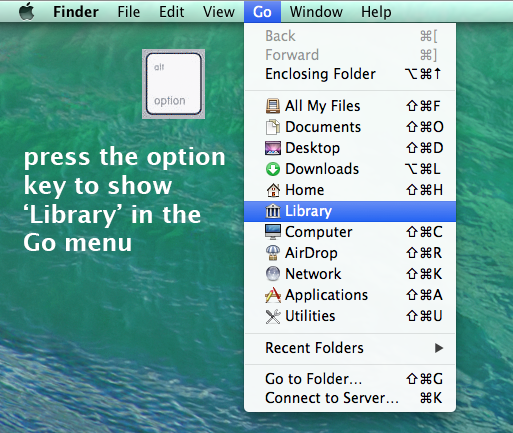
The Library folder in Mac OS 10.9 Mavericks
A new Finder window will open. It's the Library folder. Look for the 'Preferences' folder in it. This is the one you need.
Preferences are decorated with the term .plist at the end of their name. Now you search for the correct one that gives you trouble.
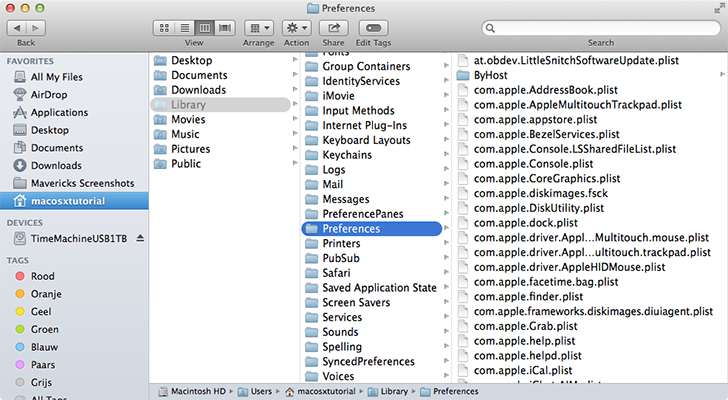
Drag and drop your 'programprefs.plist' to your Desktop. Don't throw it away yet, but first Restart your Mac and test the program. Troubles are over? Now you can throw the preference file from your Desktop to the Trash.
Finder preferences
The Finder and it's Dock also have their preferences. You can also throw them away. Don't forget to Restart!
NOTE: When you throw away your Dock preferences, the Dock goes back into it's original state. You'll have to throw in your favorite programs again. Same with all programs, user specific settings will be restored to default!
Re-installing a program
Did you throw away it's preferences, but the program still doesn't work properly? Then you can decide to re-install the program.
If there's one, use the un-installer (neat developers do make un-installers for their work). Otherwise, drag and drop the program in the Trash, together - and this is important - with it's Preferences!
Use Spotlight to search for other program files if needed.
Maybe you need an upgrade?
Pay attention to the version of the program. Maybe an upgrade or update will help? Visit the website of the manufacturer to inform yourself of the system requirements, to see if your version can work together with your Mac OS X version.
NOTE: there are programs that are very sensitive to Mac OS X system upgrades. An example of this is ProTools, a professional audio editing program. Better to keep an eye on the developer's website to keep yourself informed in case there's an update or upgrade.
The 'Other user' test
There's a simple test you can use to check if the problem is in your user section or in the general Mac OS X system.
Just log in as another user. How to make a this user, go to the User chapter and then to => More Users.
Download Android Emulator Genymotion for free http://android-emulators.com/genymotion.php for PC (Windows).
My Mac is slow
There can be many different causes for this. Let's start with the simplest ones:
- To many apps open at once?
- To many windows or tabs open in your browser?
- Hundreds of loose files on your Desktop?
- A slow (USB 1.0) external hard disk? This will slow down your Mac, specifically with the opening and saving of files.
- Spotlight is making an index? This is temporary, Spotlight needs to index the contents of your Mac first, before it can find everything fast.
- Slow start up can be caused by too many 'Open after Login' programs, or 'Open windows at login' checked on at shut down.
- Is your software out of date, does it consume too much RAM?
- External hard disk that can't handle 'Sleep' very well?
- Network disk giving you trouble?
- When did you Restart for the last time? A restart might do wonders.
- How about your hard disk, is it quite full?
Overfilled hard drive?
This is a well known cause of slow Mac's. Mac OS X uses the hard drive as a backup for the RAM as 'virtual memory'.
Not enough RAM?
To little Random Acces Memory could also be the cause of a slow Mac, but this depends on how recent your Mac is and what you're doing with it.
Mac OS 10.9 Mavericks uses RAM differently than older Mac OS X systems. It tries to use all RAM available, to make your Mac faster.
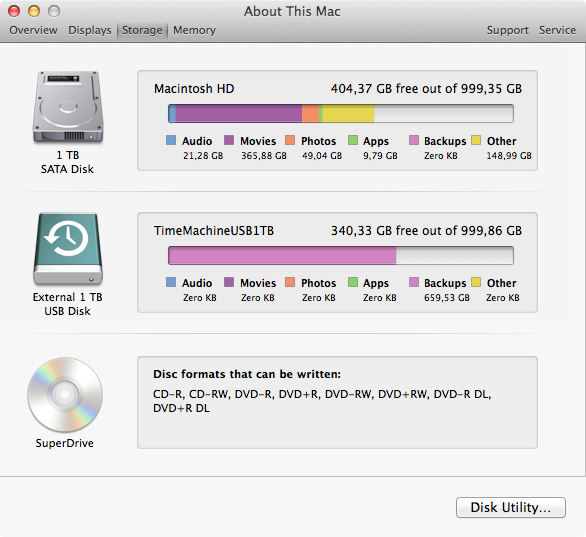
How much memory (RAM, hard disk) does my Mac have?
At the Apple Menu, at 'About this Mac' you can find more about this:
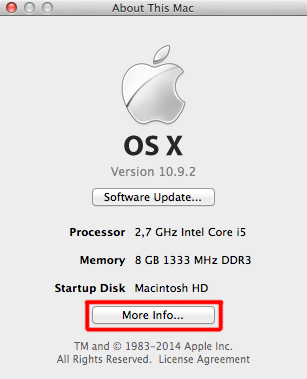
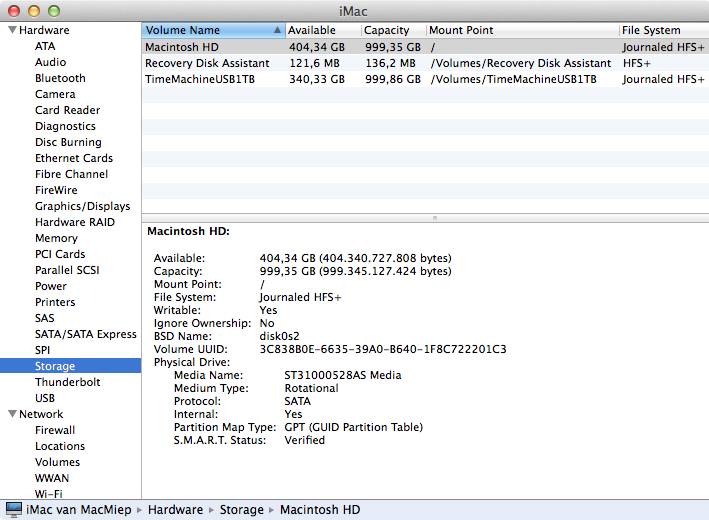
At More info... and at Storage you can see how your 'Macintosh HD' is filled and with what:
TIP
Activity Monitor: an insight into your memory use
Use the Utility 'Activity Monitor' to get an insight in how your Mac's memory is being used. In case of a slow Mac, you should look for a program or process that uses too much RAM. Spotlight is your friend to find Activity Monitor fast.

Memory: what program or process uses too much?
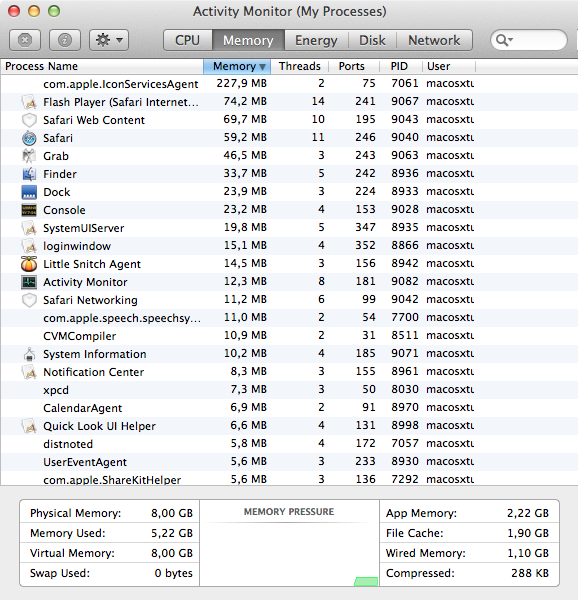
Disk: what process uses your hard disk excessively?
CPU: what program or process uses your Central Processing Unit excessively?
Same for 'Energy' and 'Network'.
Did you find the guilty one thanks to Activity Monitor, then throw away it's Preference file (as shown before in this chapter) or re-install or upgrade the program.
In case it's not a program but a process that you can't upgrade or remove yourself, you might consider instalingl a fresh Mac OS X system with keeping your data. Later on this page you'll see how to do this.
Activity Monitor: an insight into your memory use
Use the Utility 'Activity Monitor' to get an insight in how your Mac's memory is being used. In case of a slow Mac, you should look for a program or process that uses too much RAM. Spotlight is your friend to find Activity Monitor fast.

Memory: what program or process uses too much?

Disk: what process uses your hard disk excessively?
CPU: what program or process uses your Central Processing Unit excessively?
Same for 'Energy' and 'Network'.
Did you find the guilty one thanks to Activity Monitor, then throw away it's Preference file (as shown before in this chapter) or re-install or upgrade the program.
In case it's not a program but a process that you can't upgrade or remove yourself, you might consider instalingl a fresh Mac OS X system with keeping your data. Later on this page you'll see how to do this.
My Mac keeps behaving badly or my Mac is still slow
Re-installing the operating system, in other words re-installing Mac OS X, does wonders. Explanation in a moment.
WARNING
Cleaning programs
Be careful with using programs who pretend to 'clean' your Mac! They can give your more trouble than they can solve. Examples are CleanMyMac and MacKeeper.
Why do you warn for these, MacMiep?
MacMiep warns because she often get's panic emails by Mac Users who used these programs and are having big problems. They can't boot some programs, they lost data, they lost fonts, they can't boot their system in another language than English....
With that, MacMiep has seen many forum topics about people with problems after using Mac cleaning programs.
Waarom wordt soms het dan geadviseerd en krijg je zelfs korting?
Er zijn websites die (tegen betaling?) het gebruik van deze software aanraden. Het zou je Mac sneller maken door caches en logbestanden te verwijderen. Ook zou veel harde schijfruimte worden bespaard door het verwijderen van overbodige talen. Tien tot 20 GB harde schijf winst wordt genoemd.
More space on my hard drive thanks to such a program!
Ten to twenty GigaBytes could make you happy in case of a MacBook with a small SSD hard drive. But most Macs have a hard drive with at least half a TerraByte on board. Then, 20GB is PEANUTS.
So ask yourself:
Do you want to give the whole wellbeing of your Mac into the hands of a program for only 2% profit of hard disk space?!?
Self-cleaning Mac
Mac OS X is a UNIX systeem. All UNIX systems have a self-cleaning ability. This means cashes and logs are taken care of daily, weekly or monthly.
More about the myth of the 'dirty Mac': http://www.thesafemac.com/the-myth-of-the-dirty-mac/
The real reason why these programs are advertised so much
Money. The Mac is getting more and more popular. More users means more program's to sell. And as many users have switched to the Mac from the Windows operating system: it's obvious. Those people were used to use cleaning programs for their pc's. And think they have to use the same with their new Mac....
How DO I clean my Mac?
Use a soft cloth for the screen together with a special computer screen spray, and a vacuum cleaner for the keyboard. At the inside, a can of pressed air can blow away the dust, if needed. Don't use alcohol containing cleaner to clean your screen.
SWITCH-TIP
Defragmenting
Defragmenting a hard drive isn't necessary on Mac OS X. There can be large discussions on Mac fora if it's wise or not. However, in case of using very big files (HD video for example) it could be useful in case your Mac starts getting a bit slow.
Important: DO MAKE A BACKUP BEFORE YOU START DEFRAGMENTING (Time Machine).
In case you loose power when the defrag program is running, your data could be damaged!
Kernel-panic: your Mac's stuck and completely confused
When your Mac is totally of it's path, you get this screen:
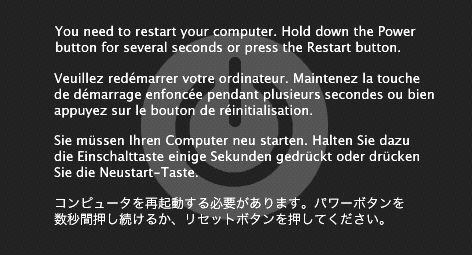
This is called a 'Kernel Panic' and there's nothing else to do but use the power button of your Mac to shut down.
Eternally turning beach ball / Mac isn't reacting to anything
First check if the batteries of your mouse or keyboard are still working.
Then give your Mac a few minutes to correct the problem. Nothing happens? Then use the power button and press it several seconds for a hard shut down
Safe Boot
After a hard shut down or in case of electric power down, it's wise to do a so-called 'Safe Boot'.
Na zulke flinke crashes en ook na een stroomstoring, is het altijd verstandig een zogenaamde Safe Boot te doen, oftewel:
Safe Boot: first choice at system-trouble. Boot the Mac with the Shift key pressed. Automatic Login will be shut down, so you'll need a password to log in. You'll see 'Safe Boot' in the screen.
Safe Boot forces your Mac to check up on the hard drive's file system and some other stuff. So don't be alarmed if the booting process takes longer than normal.

Restart your machine after booting in Safe Boot mode!
This is because your Mac won't work like you're used to. Some processes are shut down at Safe Boot, for example Wi-fi.
The Recovery partition on your Mac's hard drive (Mac OS 10.7 Lion and up)
During the installation of Mac OS 10.9 Mavericks, a special partition has been created on your hard drive. This partition is hidden, so normally you'll never see it.
On this partition, there's an installer of Mavericks and some Utilities programs. This installer uses the internet to download system data from the App Store, in case you need to re-install Mac OS X.
Recovery USB stick
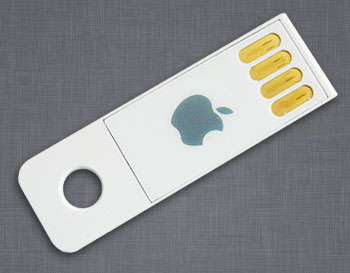
However, when your hard drive has broken totally, even this Recovery partition won't be usable. So then you'll need something else. Without broadband internet this will be troublesome. So Apple sells USB sticks with an installer of Mac OS X on it:
Make a recovery USB stick yourself
Apple has made a little program to make an USB recovery stick for free. Use a stick of minimally 1 Gigabyte for this. The program's name is OS X Recovery Disk Assistant and can be downloadedd at http://www.apple.com/osx/recovery/.
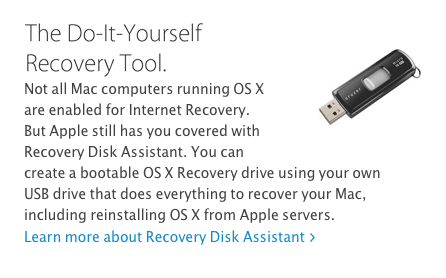
How to make a Mountain Lion Recovery Disk Assistant?
Download the program from the Apple website:

NOTE: this program is obviously suited for Lion, Mountain Lion en Mavericks!
 =>
=> 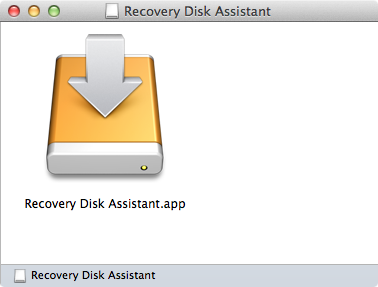
It's a .dmg. Open it and start the program and follow the instructions:
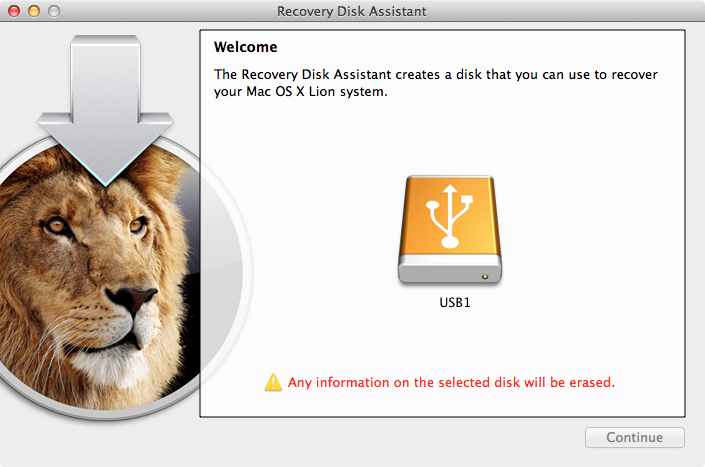
You'll need an administrator password to do this!
WARNING
Be careful using older system disks!
Mac OS 10.7 Lion and higher don't use system disks (cd's or dvd's you used to get with your new Mac). Never use these old disks to recover or repair a newer OS X system!
Be careful using older system disks!
Mac OS 10.7 Lion and higher don't use system disks (cd's or dvd's you used to get with your new Mac). Never use these old disks to recover or repair a newer OS X system!
Boot from Recovery partitie (or a USB recovery stick)
1. Restart your Mac with the Command and R key. This will force the Mac to boot from the hidden Recovery partition. In case this doesn't work:
2. Boot the Mac with the Option-key. Now choose the Recovery partition (or USB recovery stick).
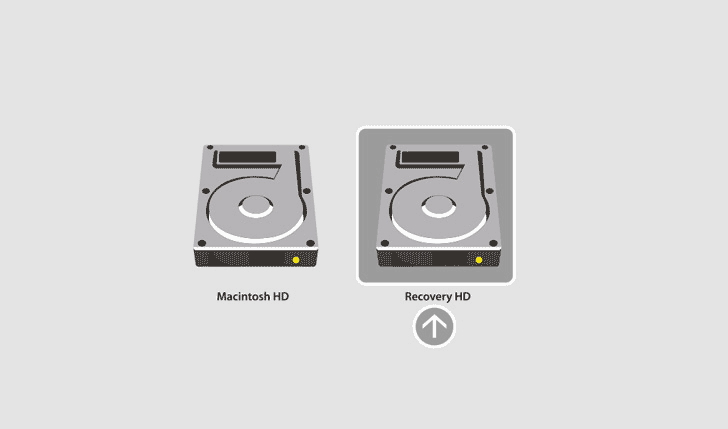
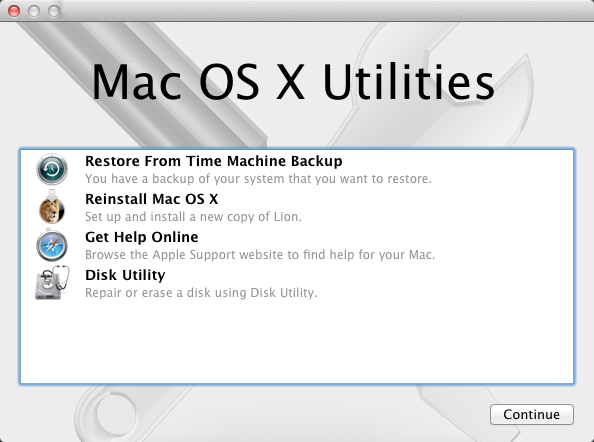
After startup from Recovery partition, you'll see this window:
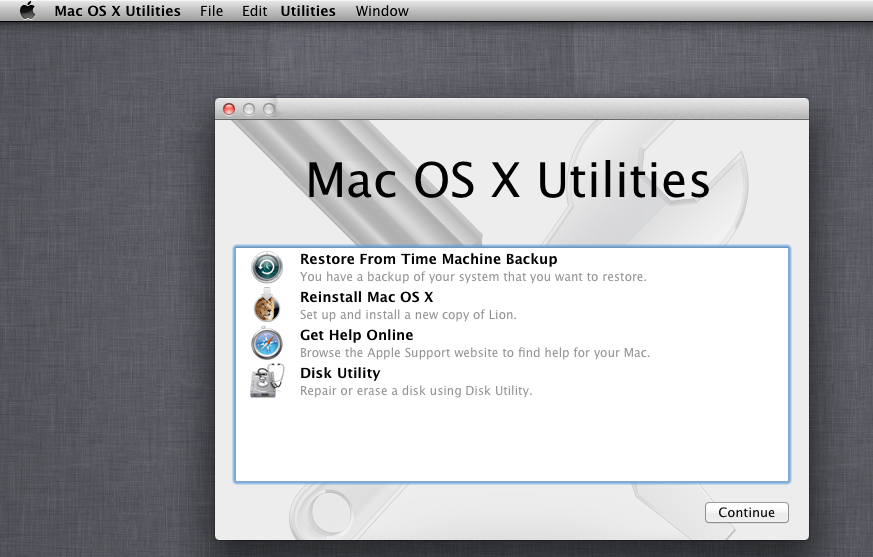
Mac OS X Utilities
There are four options:
- Restore from Time Machine-backup. SeeTime Machine about how to make one.
- Reinstall Mac OS X
- Look for help online
- Disk utility
Let's start with Disk Utility: Repair Disk Permission
Boot from Recovery and go to Disk Utility.
Click Verify Disk Permissions and, if there are faults found, on Repair Disk Permissions.
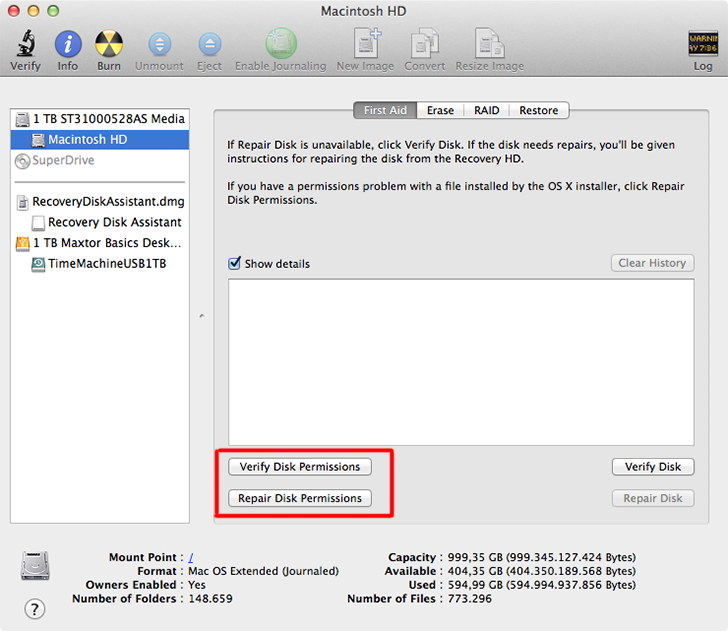
This might be a solution to some problems. But where not there yet. Let's now check our hard drive.
Verify your Mac's hard disk
A hard drive is a mechanical device that has to work very hard. With Disk Utility you can give it a check up. It verifies:
1. the file system
2. The S.M.A.R.T.-status* :

*Self-Monitoring Analysis and Reporting Technology. Many hard drives have a chip on board that self monitors the disk. This chip can be read with Disk Utility, but an alternative program who gives you much more information is Smart Utility.
SMART status
You can see the SMART status at the bottom of the Disk Uitity window. Does it read Checked, then there's no problem.
Does it say About to fail:
BACKUP IMMEDIATELY AND REPLACE THE DISK!
NOTE: not all external hard disks have a SMART function on board.
How to test your Mac's hard disk.
Boot from Recovery (preferable a USB stick) by using Command-R or Option-key at startup.
Choose ‘Disk Utility’. Select the proper disk and choose at the First Aid tab op Verify Disk and after that - if needed - Repair Disk.
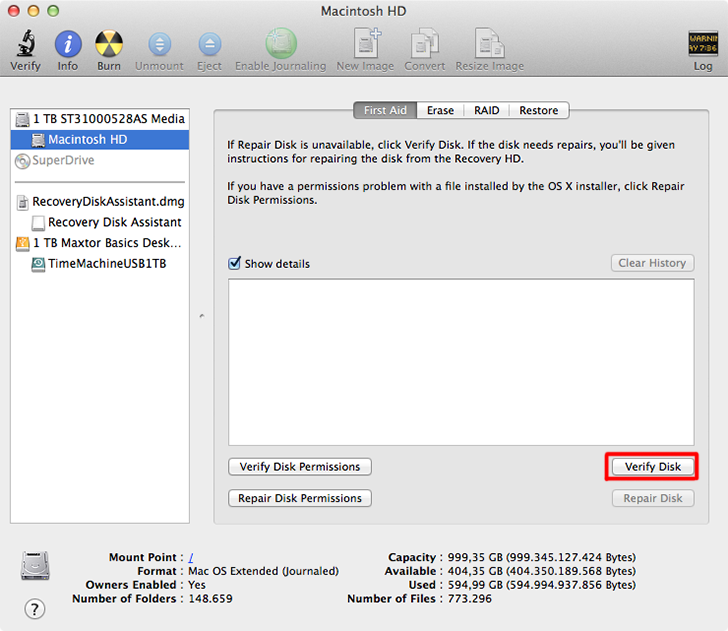
NOTE: Disk Utility won't change anything with your hard drive during testing. It won't change any bits or bytes unless you choose 'Repair'.
Repairing isn't possible or it doesn't help
In case Disk Utility can't repair your hard drive, you have a real problem. Hopefully you have a backup of your data!
You can do two things:
1. try to repair the disk with other software (for example Disk Warrior).
2. erase the hard disk and start from scratch with a fresh Mac OS X => more about this at the next TIP.
NOTE: You can erase any external hard drive with ease, but in case you need to erase your boot disk, you better boot your Mac from a USB Recovery stick.
My hard disk is okay, but my Mac still behaves badly/ is slow / unstable
What you can do now is installing a fresh Mac OS X system. This means that you only install the Mac OS, and you leave your user data alone. "Install a clean system" is this called.
So you're just replacing your 'faulty' Mac OS X system with a new installed one. The installation will leave your user data alone.
However: It's always wise to make a backup of all your data BEFORE doing this. In case you use Time Machine, you are in the safe zone.
Re-install Mac OS X WITHOUT LOOSING DATA
First, boot your Mac from Recovery disk. Then choose 'Reinstall Mac OS X':

Apple ID needed for downloading Mavericks
You'll need your Apple ID for downloading Mac OS X 10.9 Mavericks from the Apple Store.
I have the Apple USB stick
Do you have the original Apple sold 'OS X USB Thumb Drive' with a full Mavericks installer? Then you won't need an internet connection or an Apple ID.
NOTE: you can't use both methods (download install and stick install) together. Once you use the stick, you always have to use the stick.
I use Time Machine
So you have a recent backup on an external hard disk made by Time Machine? GREAT!
And this is a backup that was made before the problems started? NICE!
Now you can restore this backup and this will be a lot easier.
Restore from Time Machine-backup...
Now you don't need to install a new Mac OS X, but you only need to copy the backup back.
Boot from Recovery and choose Restore form Time Machine-backup...

Follow the instructions on the screen. Your Mac will show you the Time Machine data. Don't forget to choose the proper time and date of the backup!
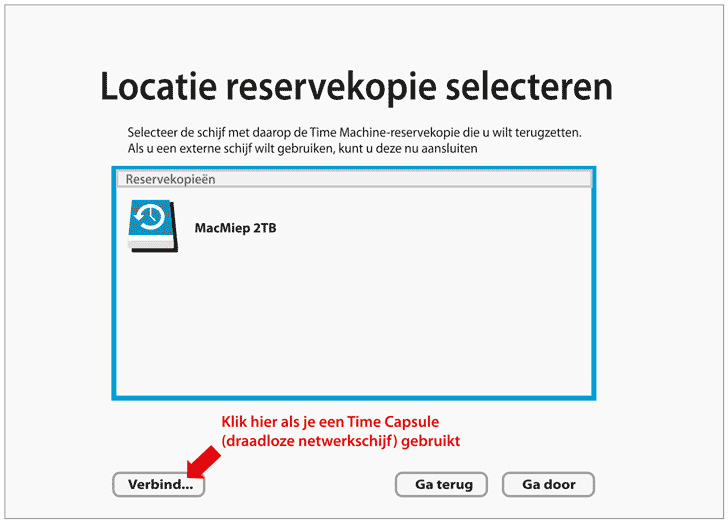
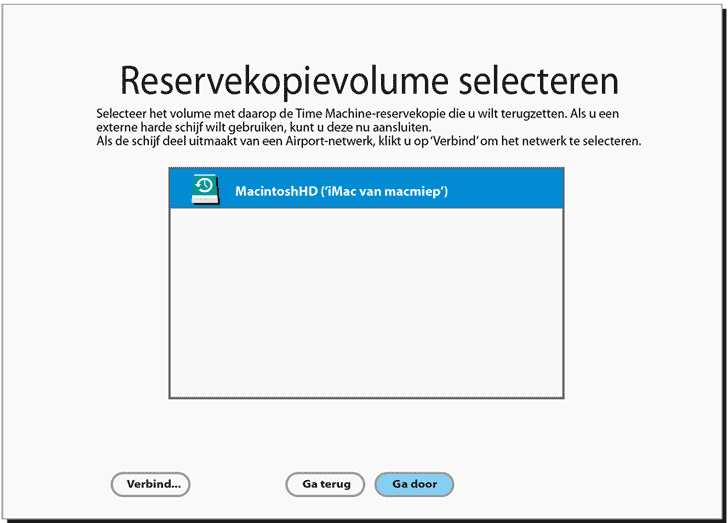
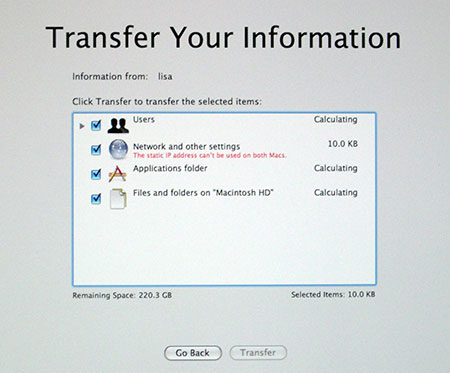
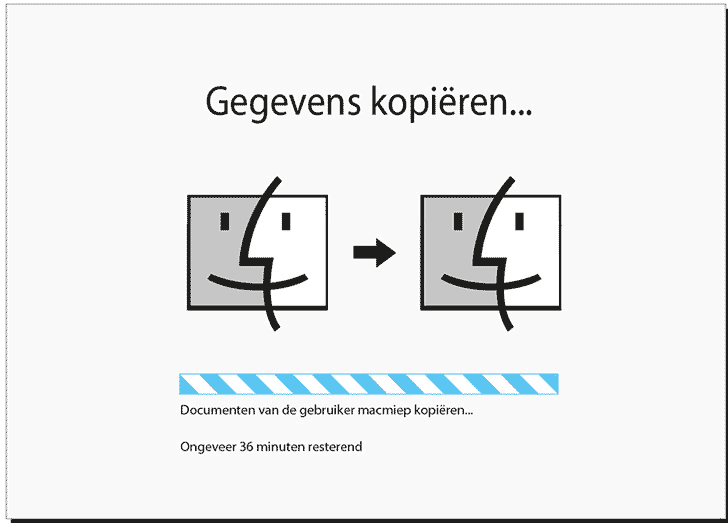
NOTE: Depending on the speed of the external hard drive you can go back to work sooner or later.
TIP
Total erase and new install: WITH LOSS OF ALL DATA
This is a heavy measure on a Mac and most users won't need to do this ever, but it's important that you know how to do it.
We are going to erase the whole hard disk. This is only necessary in case there's no repair possible with Disk Utility or other repair programs.
Another occassionchoice to do this is in case you want to sell your Mac and you worry about privacy. More about this in the Privacy chapter.
Total erase and install:
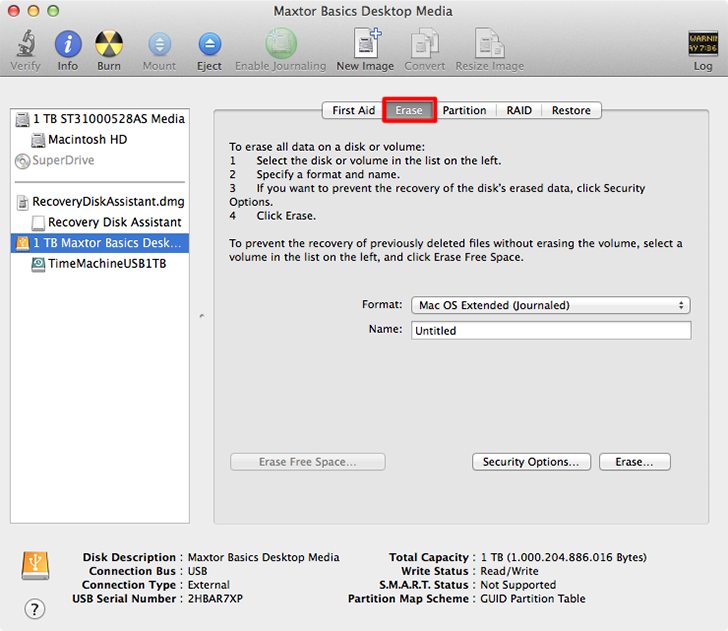
Boot from Mac OS X Recovery (Option-key during start up and make your choice) and choose 'Disk Utility'.

Go to Disk Utility and go to the 'Erase' tab:
TIP
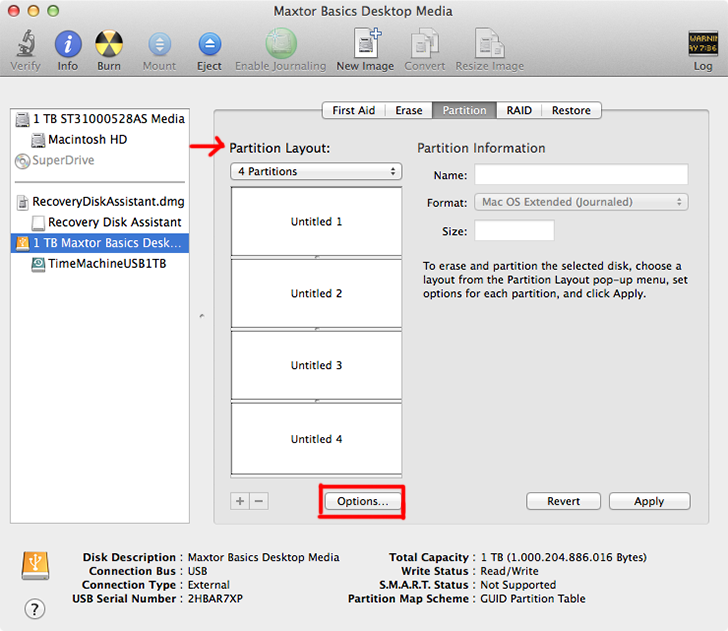
Partitioning
You can choose to partition your hard disk, in you like. Go to the Partition tab for that.
TIP
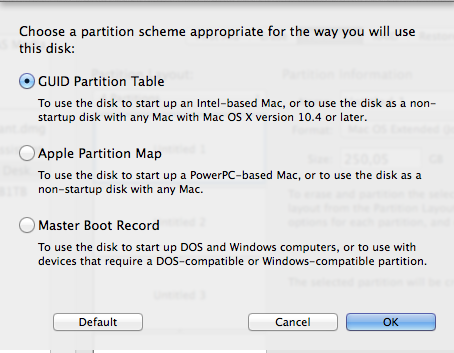
GUID Partition Table
In case you choose to partition your disk, remember to give the Mac OS X startup partition a 'Guid Partition Table'. You can find this at 'Options'. BTW: 'Master Boot Record' is Windows-only.
TIP
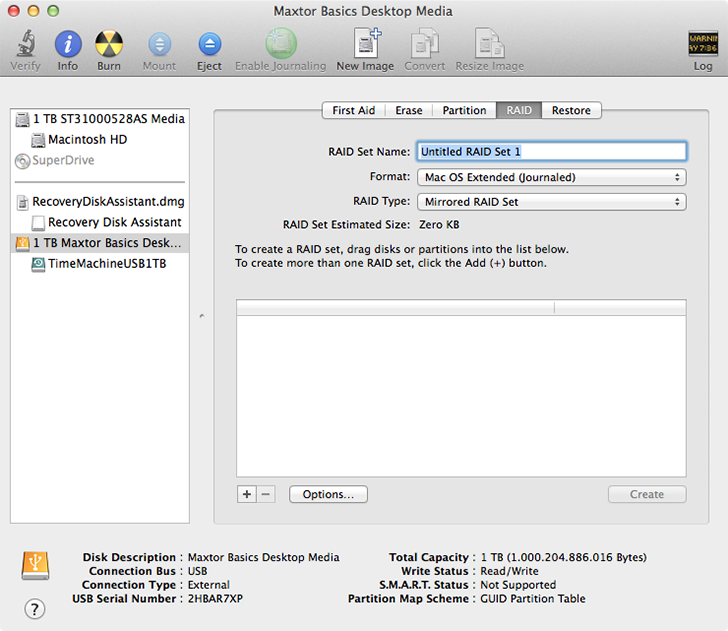
RAID
Off course, Mac OS X supports 'RAID': multiple hard disks are virtually connected to make on hard drive. This is used a lot in servers and NAS disks.
Erase options
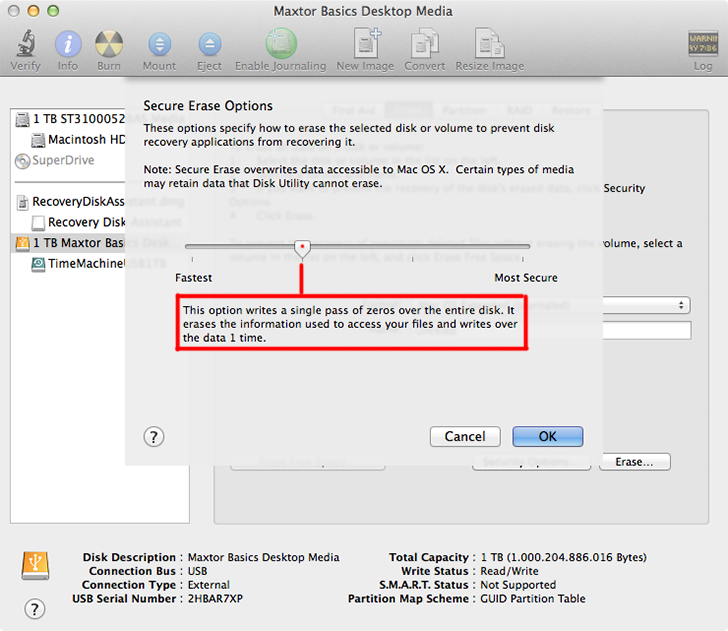
Erasing can be done in several ways. You can find these at 'Security Options'.
Was your hard drive giving your trouble? Then choose 'write a single pass of zeros over the entire disk'.
This will take a long time. In case you want to sell your mac, use an even higher security option. See the Security chapter => Privacy.
Do not interrupt your Mac during this procedure and keep your MacBook on it's power connector all the time!
Total erase and new install: WITH LOSS OF ALL DATA
This is a heavy measure on a Mac and most users won't need to do this ever, but it's important that you know how to do it.
We are going to erase the whole hard disk. This is only necessary in case there's no repair possible with Disk Utility or other repair programs.
Another occassionchoice to do this is in case you want to sell your Mac and you worry about privacy. More about this in the Privacy chapter.
Total erase and install:
Boot from Mac OS X Recovery (Option-key during start up and make your choice) and choose 'Disk Utility'.

Go to Disk Utility and go to the 'Erase' tab:

TIP
Partitioning
You can choose to partition your hard disk, in you like. Go to the Partition tab for that.

TIP
GUID Partition Table
In case you choose to partition your disk, remember to give the Mac OS X startup partition a 'Guid Partition Table'. You can find this at 'Options'. BTW: 'Master Boot Record' is Windows-only.

TIP
RAID
Off course, Mac OS X supports 'RAID': multiple hard disks are virtually connected to make on hard drive. This is used a lot in servers and NAS disks.

Erase options
Erasing can be done in several ways. You can find these at 'Security Options'.
Was your hard drive giving your trouble? Then choose 'write a single pass of zeros over the entire disk'.
This will take a long time. In case you want to sell your mac, use an even higher security option. See the Security chapter => Privacy.
Do not interrupt your Mac during this procedure and keep your MacBook on it's power connector all the time!

Help! I don't have a Recovery partition or stick
The latest Mac's (Mac OS 10.7 Lion and up) can boot without a Recovery partition or a stick. This is called Internet Recovery. However: a broadband internet connection is required.
Mac OS X Internet Recovery
Boot your Mac with Command-Option-R and Internet Recovery will appear.
You'll see a turning world on your screen. Be patient.

Your Mac phones home for help
It will connect to the Apple servers directly to download a recovery partition and place it on your hard drive.
Then the Mac is able to boot from that partition and then you have all utilities to repair, restore or re-install your Mac.
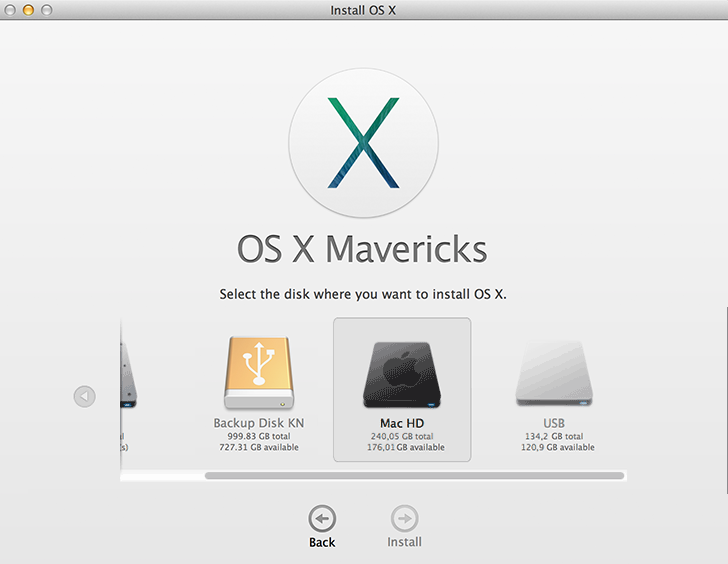
NOTE: in case you're using Internet Recovery, you are obliged to use a WPA2 secured Wi-fi network or an ethernet connection.
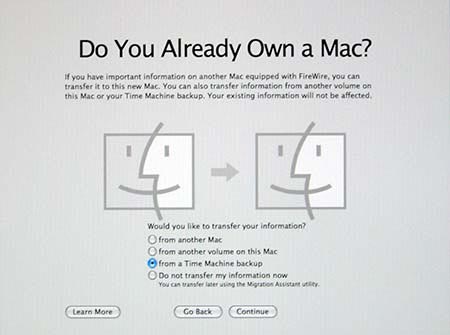
'Do you already own a Mac?’
After installing Mac OS X you'll get this question. A smart Mac user has a Time Machine backup and is ready for restoring his data.
Choose 'From a Time Machine backup' and follow the instructions on screen. It's easy!
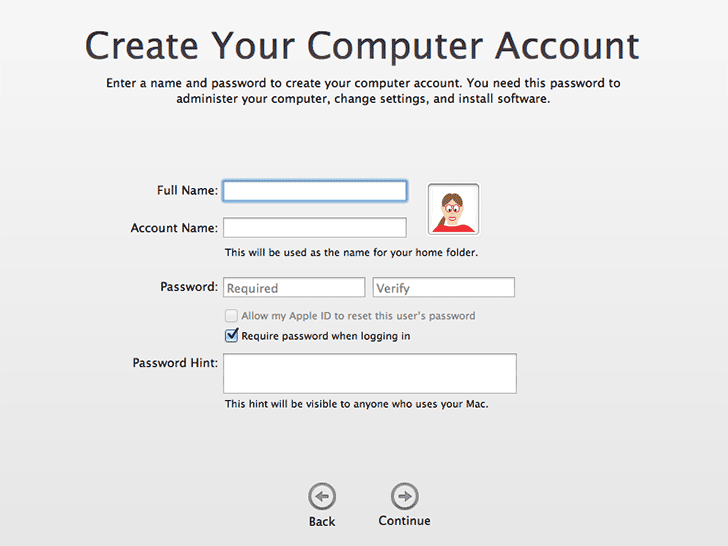
No backup available
In case you don't have a backup, the Mac will go though the same procedure as if you just bought it.
It will ask you to choose an Account Name.
At last: Mac OS X Help Center
Mac OS X and most programs have a Menu called Help. Insert your search word and Help Center will help you find an answer.

NOTE: You need to be online for this!
Find help online
Still no solution for your problem? Use the many Mac community websites. Maybe your problem is already known and there's a solution. You can even use Recovery to surf the internet for solutions, as Safari works when you boot from Recovery.
Know your Mac!
As soon as you seek help on the internet or at a helpdesk, be sure to be able to tell what kind of Mac you have and what Mac OS X version it uses. Otherwise they won't be able to help you properly.
Go to the Apple menu to About this Mac:

Click on More Info... to know everything about your favorite fruit.
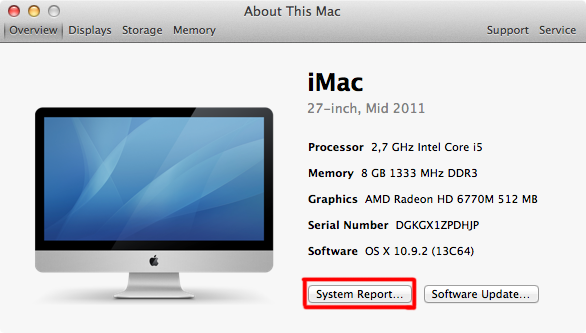
At System Report... you'll find all the details of your Mac.
EtreCheck
A useful little program you can use is EtreCheck. It makes a neat report of you Mac's system software. It's easy to copy this to email or post on a website.
View Best Messengers for Android in USA by Country
Disclaimer: MacMiep is independent. This means she writes what she wants, based on 20+ years of Mac-experience. She doesn't get paid for stories (positive or negative) on this website.